
Catholic Saint Pumpkins

Before you say “No way I can do this!”, I want to tell you that you can!!! It is so much easier than it looks and once you try this style of carving pumpkins you won’t want to do it any other way! There are a few things you will need to have in order to do these pumpkins, but I’m telling you it is SO WORTH IT!
But more importantly, this is not about making awesome pumpkins! It’s about HOW you enter into this craft! It’s about seeking the joy the Lord wants to give us in this moment! Maybe if you’re by yourself, carve your pumpkin outside on a picnic blanket and notice the breeze and the birds - and thank God for those things! Maybe if you’re having a pumpkin carving party with your friends, notice the laughter, the conversations you are having - and thank God for that too! It’s about making our hearts aware and attentive to all the little ways that He wants to love us! With that in mind, let’s get into how to make these pumpkins!
What You’ll Need.
Here are the links for all the materials that you will need! Each of these makes your pumpkin project so much easier, but not all of these are absolutely needed! You can get creative with tools around your house if you want! But there are two products that I personally think are a must-have: A Speedball Linoleum Cutter and Stick n’ Carve Transfer Sheets.
*Disclosure: Some of the links below are affiliate links, meaning, at no additional cost to you, I will earn a commission if you click through and make a purchase.
A nice Large Pumpkin - about 12 inches tall
Using your Transfer Sheet

Once you have chosen your favorite Saint Stencil to use, you need to print out a reference photo on regular paper and another one on the Stick n’ Carve Transfer Sheet. The reference sheet will also help you determine the right size image for your pumpkin. It may take a little trial and error. Note: Before printing on the Transfer Sheet, make sure that you will be printing on the textured side of the sheet. You can test this with a little “x” or pen mark on a normal piece of copy paper.

I then cut around the Saint image so that it is easier to place on my pumpkin. So, on an already hollowed out, clean and dry pumpkin, you will want to peel off the backing of the Transfer sheet and put the image on your pumpkin. Really make sure the stencil is adhered by rubbing every nook and cranny of the pumpkin!
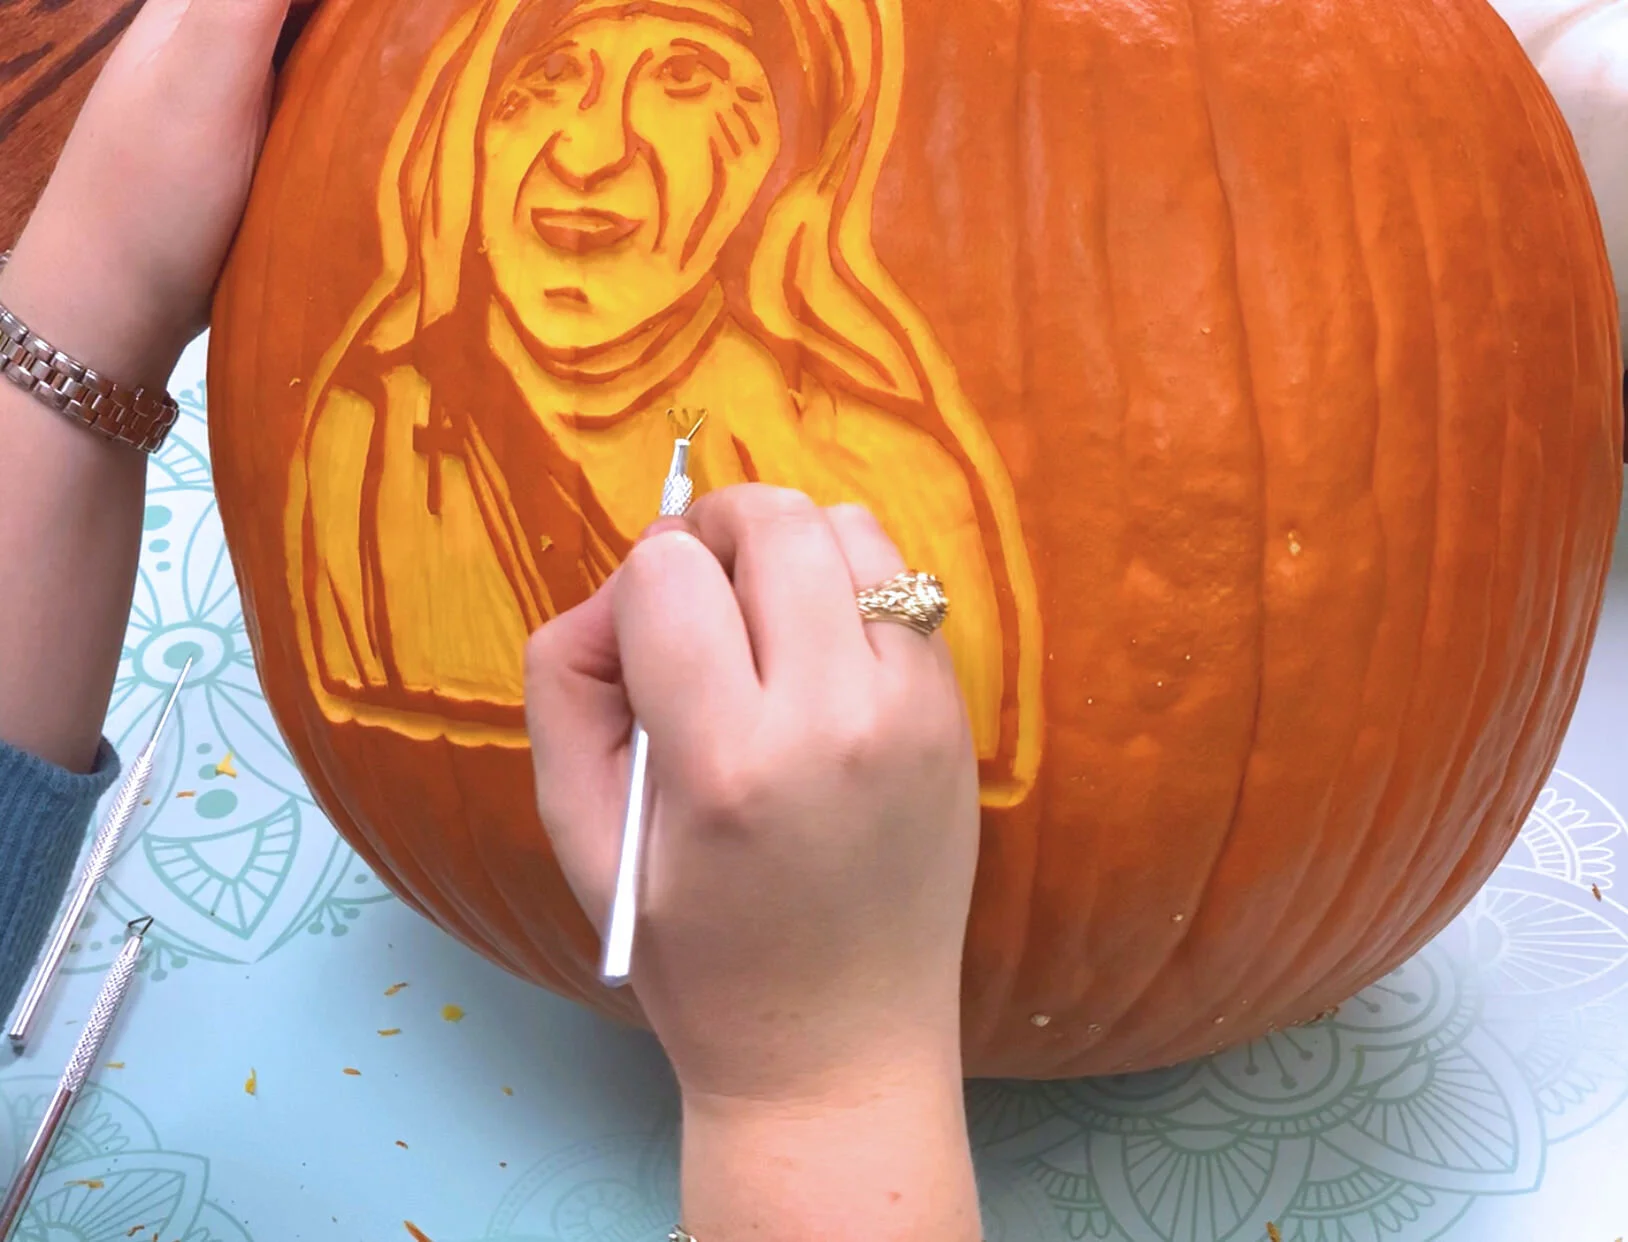
Carving Your Pumpkin

Now you will want to take your Craft knife or X-acto knife and begin tracing around every black line of your stencil. The white of your stencil is what you will be shaving away. The black part of the stencil is what you will NOT be shaving. This part is important, so take your time! You’re in no rush right?!
Grab your reference sheet now because this is where its going to come in handy! That way you don’t scrape away anything that was supposed to stay!

Here is where the magic happens and it’s all because of this amazing tool, the Speedball Linoleum Cutter! I’m telling you…this changed my pumpkin carving life forever! First take the smallest attachment #1, and shave around all the areas that you won’t be carving. This will make it clear to you later what you should and should not keep - trust me!
Once you are finished tracing around all the areas that were “black”, you will want to switch to tip #5. This will help with removing any larger areas of your pumpkin that need to be shaved.

Tip #1

Tip #5
Finishing Touches
After carving your pumpkin this way, it can leave behind some “rough edges”. You can smooth out these areas of your pumpkin with your clay scraping/sculpting tools.

After your final touches, its time to make the inside of your pumpkin wall thin enough so that light can shine through. You can use whatever tool you want, but I found that this Clay Carving Tool makes this process go SOOO MUCH faster and produces great results! You can test to see if your pumpkin wall is thin enough by checking your pumpkin in a dark room with a strong light inside your pumpkin. This may take a little trial and error, but you will get there!


Make a mistake? Use Super Glue or a marker to cover up your mistakes! Mistakes happen and its OKAY!!
And Voilà! You have an incredible Saint pumpkin!

Preserving Your Pumpkin
There are two ways you can help make your pumpkin last longer! The first way is to submerge your pumpkin in one part bleach to one part water. Leave it in there for about 10 minutes and then dry it off! The second way is to use Wet and Forget, a mildew and mold remover. You can spray your pumpkins with this once a week and they will last for a very long time! You’ll be surprised!
Looking for more Saint Stencils? Click here or go to the store on this website! Again, the links for everything you may need will be listed below!
A nice Large Pumpkin - about 12 inches tall
*Craft time approximately 3 hours
Enjoy being loved by the Lord and the Saints while carving your pumpkin! And share with me pictures of your amazing pumpkins on my social media @godslittle1
*We are a participant in the Amazon Services LLC Associates Program, an affiliate advertising program designed to provide a means for us to earn fees by linking to Amazon.com and affiliated sites.